The Github Actions Trick

When you are a student or even as a developer, you sometimes don’t want to expose your codebase to the public. Especially in today’s age of AI, anyone can preview it and replicate your source code within an hour.
Let’s say you wish to make a GitHub Pages for your small repo, and you are embarassed to show your code in public. And as student it doesn’t make sense for you to spend your money for this!
(First time? I know.)
Making a GitHub Pages for a private repo is not available for free tier accounts. But.. There might be a way after all.
Also I don’t like this entire free and paid tier in GitHub. Hence this guide.
The Problem at Hand
As I have briefed this previously, I discovered this trick when I wanted to host a simple static web page using GitHub Pages.
The problem is, GitHub Pages can only be created from a public repo. Only paid accounts can host it in Private repos. I neither want to make my repo public nor do I want to pay for this stupid GitHub Pro for which I have no use.
(Duh, I am embarassed with this funny looking garbage. I just want to get things done and host it up.)
Here comes GitHub Actions for rescue.
Why we use GitHub Actions?
As a developer or even DevOps Engineer, familiarizing GH Actions will take you far. It is a good starting point and very easy.
GitHub Actions is a CI/CD tool which can be used for automating your software development workflows. In simple words, it is an automation tool.
If you are interested in learning from documentation , which covers it in detail, do go through. I am a firm believer of reading the docs.
A Simple Mental Model
Think of GitHub Actions as a remote computer which executes all of your commands you have given it. Developers generally would use this to build their applications and test it. You can also set the type of environment you want to run - Linux or Windows OS. Yes, it is just like your local computer.
What differentiates the GitHub actions from your Local computer? It’s the YAML file.
The protagonist of GitHub Actions - YAML
The YAML file is a simple Mark Up file which is just like JSON. To put it simply, YAML file is like a data input file where you set the input values. It is a tiny Database encapsulated in a file with extension .yml or .yaml.
The GitHub Actions is an inbuilt execution engine which will automatically start running if it detects a YAML file inside .workflows folder in your repo.
It is automatically set in GitHub, no extra steps required.
What GitHub offers for free
In free tier, GitHub will allow you to create unlimited repos. And it also allows you to run the GitHub Actions for free in a private repo.
Then what problem are we solving? Our main concern here is to host your static web app via a private repo. This is not available (yet) in the free tier of GitHub.
The Solution - Using GitHub Actions
To solve our problem we will use a two pronged approach.
- A public repo for the GitHub Pages set up
- A private repo where all the code logic rests, which we want to hide.
I know we will be creating an extra repo for this, but why do we care as this solves our problem anyways.
Let’s assume that you already have a static web app you want to host.
Create a private repo for it, we will refer to this repo as web-app or web-app repo.
There will also be a repo which will be used to host your GitHub Pages, refer it to as pages repo.
Configuring the GitHub Actions
In your pages repo create a folder and a sub-folder: .github/workflow to the root of your pages repo
This is the place where we will be doing the magic.
Inside the workflows folder, create a fie called nextjs.yaml (The naming doesn’t matter it should end with YML or YAML file extension)
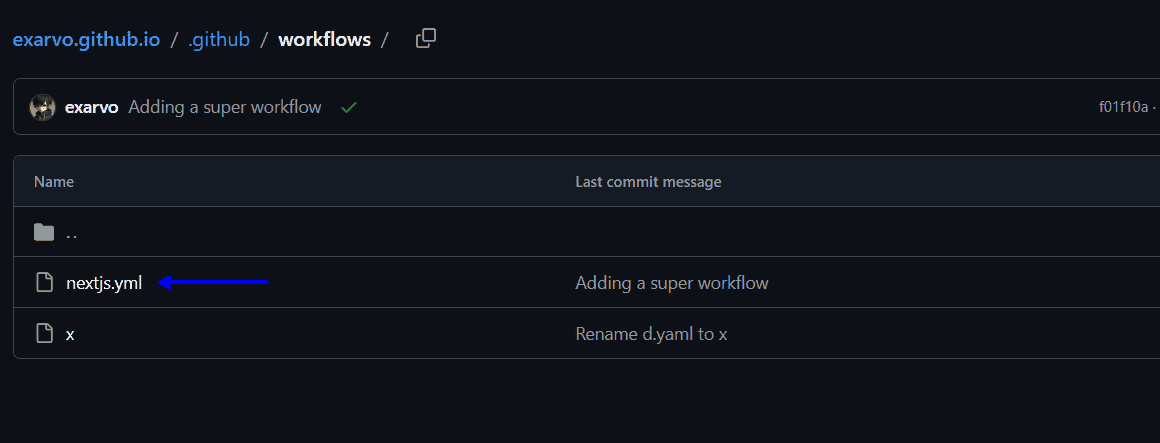
Creating a YAML file under .github/workflows will automatically set the GitHub Actions for you. GitHub automatically detects and initiates it.
The Solution YAML
GitHub already gives templates whenever you are trying to deploy a particular app. Let’s say, for a Nextjs app, it has a template you can use and build upon.
For our example, here’s nextjs.yaml:
# Sample workflow for building and deploying a Next.js site to GitHub Pages
#
# To get started with Next.js see: https://nextjs.org/docs/getting-started
#
name: Deploy Next.js site to Pages
on:
# Runs on pushes targeting the default branch
push:
branches: ["main"]
# Allows you to run this workflow manually from the Actions tab
workflow_dispatch:
# Sets permissions of the GITHUB_TOKEN to allow deployment to GitHub Pages
permissions:
contents: read
pages: write
id-token: write
# Allow only one concurrent deployment, skipping runs queued between the run in-progress and latest queued.
# However, do NOT cancel in-progress runs as we want to allow these production deployments to complete.
concurrency:
group: "pages"
cancel-in-progress: false
jobs:
# Build job
build:
runs-on: ubuntu-latest
steps:
- name: Checkout
uses: actions/checkout@v5
- name: Detect package manager
id: detect-package-manager
run: |
if [ -f "${{ github.workspace }}/yarn.lock" ]; then
echo "manager=yarn" >> $GITHUB_OUTPUT
echo "command=install" >> $GITHUB_OUTPUT
echo "runner=yarn" >> $GITHUB_OUTPUT
exit 0
elif [ -f "${{ github.workspace }}/package.json" ]; then
echo "manager=npm" >> $GITHUB_OUTPUT
echo "command=ci" >> $GITHUB_OUTPUT
echo "runner=npx --no-install" >> $GITHUB_OUTPUT
exit 0
else
echo "Unable to determine package manager"
exit 1
fi
- name: Branch
uses: actions/checkout@v5
with:
repository: ${{ secrets.NAME }}
token: ${{ secrets.PERSONALT }}
path: blog
- run: cp -r blog/home/. ./src/app/articles
- name: Setup Node
uses: actions/setup-node@v4
with:
node-version: "24"
cache: ${{ steps.detect-package-manager.outputs.manager }}
- name: Setup Pages
uses: actions/configure-pages@v5
with:
# Automatically inject basePath in your Next.js configuration file and disable
# server side image optimization (https://nextjs.org/docs/api-reference/next/image#unoptimized).
#
# You may remove this line if you want to manage the configuration yourself.
static_site_generator: next
- name: Restore cache
uses: actions/cache@v4
with:
path: |
.next/cache
# Generate a new cache whenever packages or source files change.
key: ${{ runner.os }}-nextjs-${{ hashFiles('**/package-lock.json', '**/yarn.lock') }}-${{ hashFiles('**.[jt]s', '**.[jt]sx') }}
# If source files changed but packages didn't, rebuild from a prior cache.
restore-keys: |
${{ runner.os }}-nextjs-${{ hashFiles('**/package-lock.json', '**/yarn.lock') }}-
- name: Install dependencies
run: ${{ steps.detect-package-manager.outputs.manager }} ${{ steps.detect-package-manager.outputs.command }}
- name: Build with Next.js
run: ${{ steps.detect-package-manager.outputs.runner }} next build
- name: Upload artifact
uses: actions/upload-pages-artifact@v3
with:
path: ./out
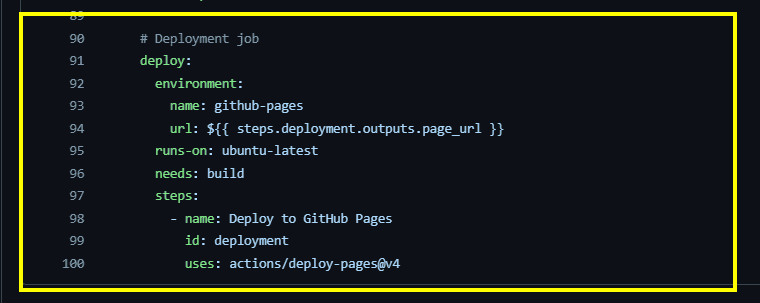
# Deployment job
deploy:
environment:
name: github-pages
url: ${{ steps.deployment.outputs.page_url }}
runs-on: ubuntu-latest
needs: build
steps:
- name: Deploy to GitHub Pages
id: deployment
uses: actions/deploy-pages@v4That’s a lot of lines of code. OMG!
Explanation on the YAML Code
The initial bit: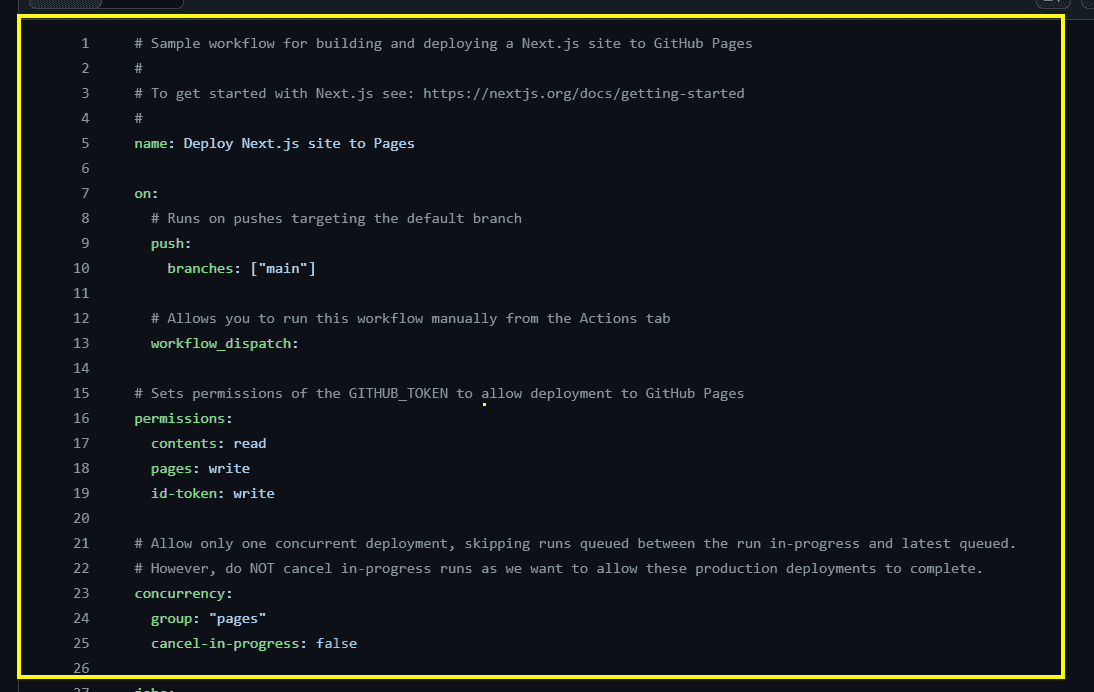
This part of the code is about the initialization of the Actions. Each line is doumented regarding why it is in place.
To summarize, this actions will run whenever there is a latest commit on main branch in the repo. And it also has certain read and write accesses which is used by the Actions to publish to GitHub Pages.
The usual Jobs: Jobs in GH Actions refer to a set of steps that run in a specific environment to automate the tasks within a workflow.
You can think of it as collection of automation scripts grouped together as a “Job”.
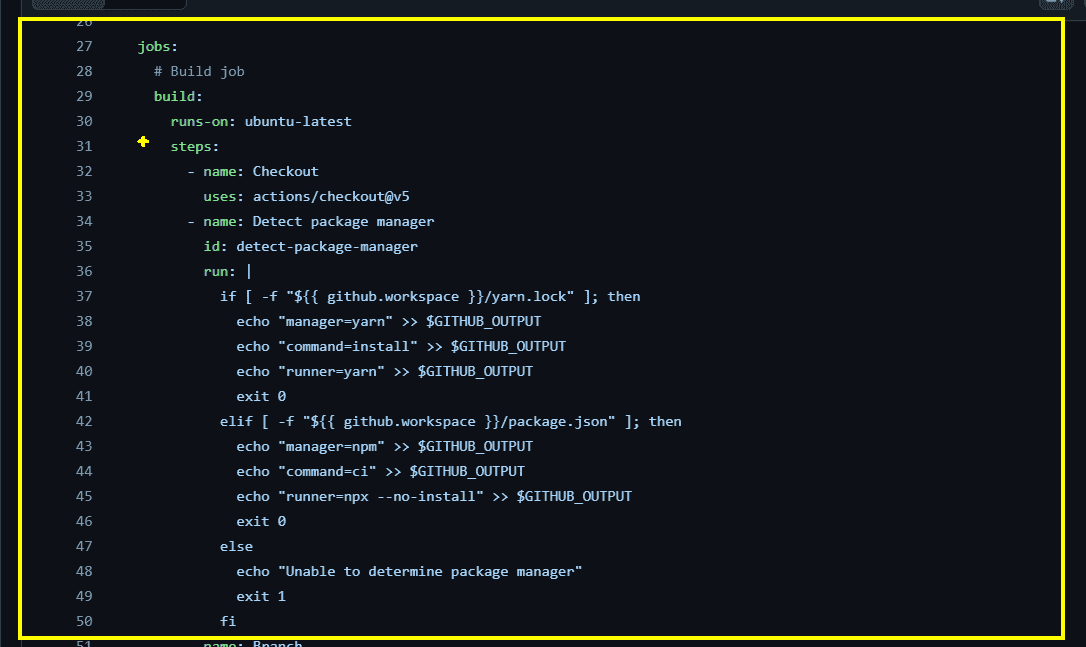
The initial definition for a Job is runs-on which you can configure it to either run in a linux OS or windows OS. This is defined in line 30.
The rest of the ‘Steps’ are used to set the environment within the linux box and run the logic.
The rest of the code logic checks out to the main branch of the repo and detects the package manager to be used.
This is a small automation script to generalize the usage and detection of the correct package manager to build and install for the application, that goes till line 50.
The meat of the matter - actual trick for trade
Here comes the actual trick I have been teasing you till now. This is where the magic happens. It isn’t something path breaking, it’s a simple knowledge you need to have to make your life easier.
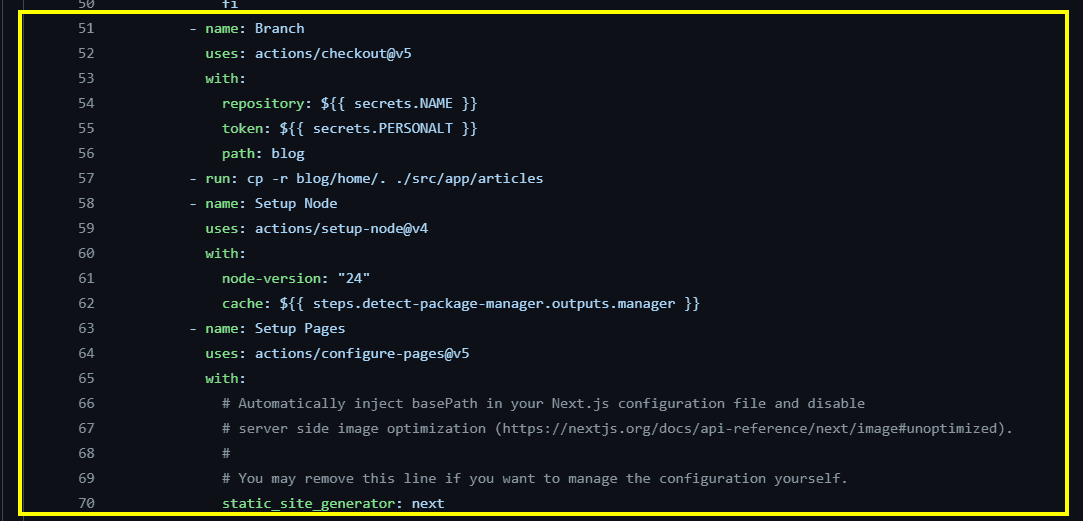
In the line 51 we start a new step in the Job which will actually go into your private GitHub repo and copies the content in the current instance!
Yes. This will solve all our problem. For my use case I wanted to make my blog content as private, because there are lots of drafts that I don’t want to make it visible to public.
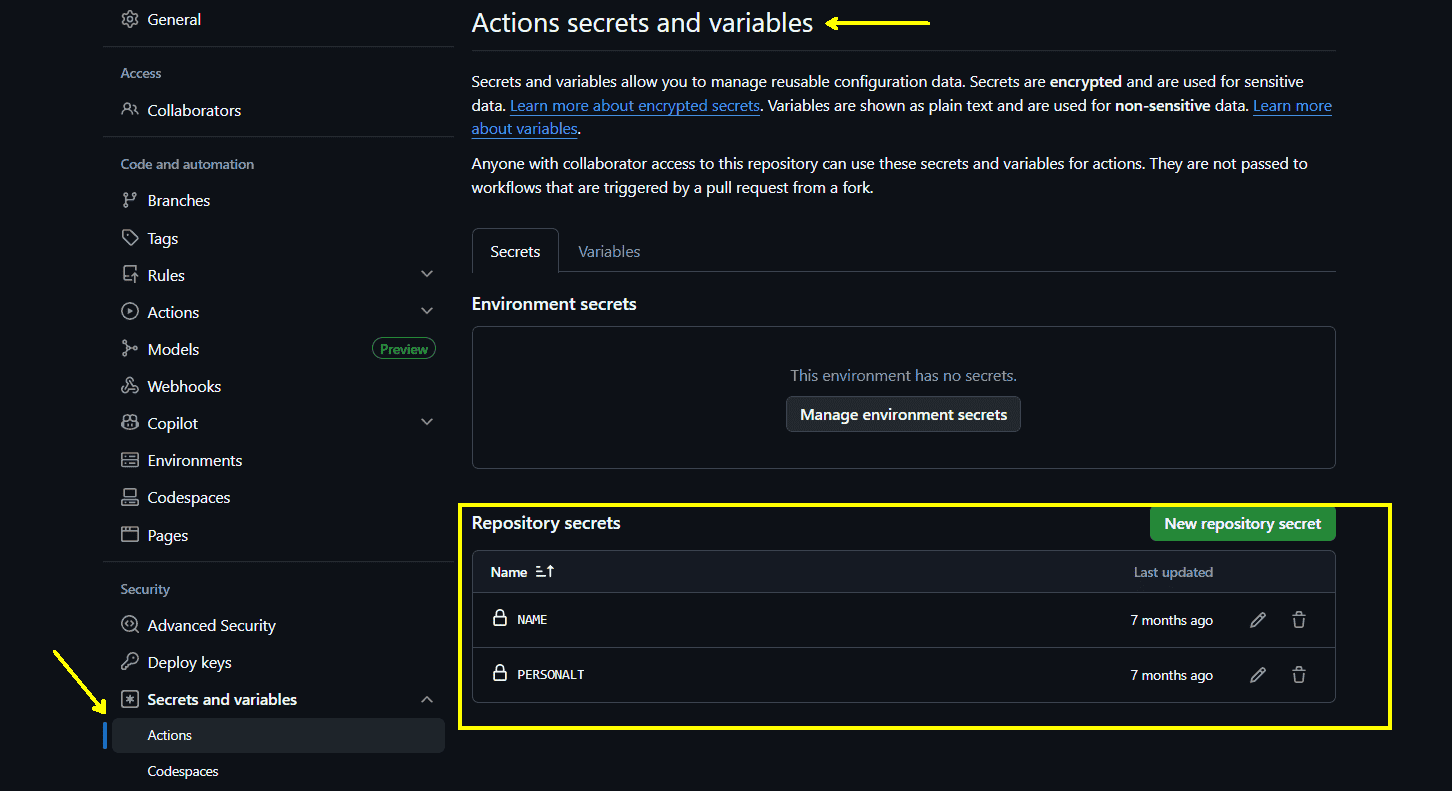
So the line 54 will checkout to the private repository which I have hidden as a GitHub Secret Variables (not necessary but I am extra careful).
Generally all of your environment variables must be hidden from public as it is the best practice. And to access the GitHub repo, you need to also have your personal token which very much shouldn’t be visible to public!
How to do it?
- Go to the settings of your repo:
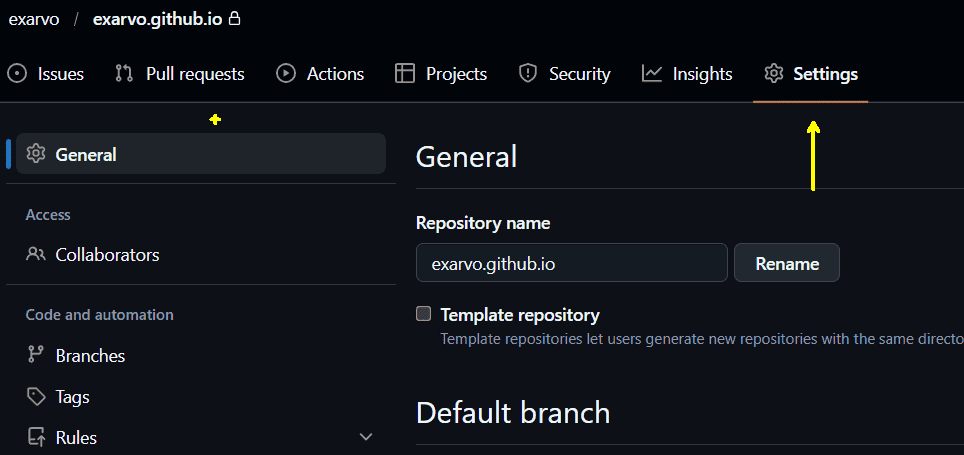
- If you scroll below you have an option for Secrets and variables option in the settings. You can set the secrets or variables from here:
In the line 57 - we literally copy files from a different repository into this! It won’t be shown in your public repo ofcourse!
In this way, you can literally copy files from your private repos and paste it into the context of the current repo.
So you can literally create a GitHub Pages (which is only allowed for Public repos) for a free tier account using the code or data from a private repo!
There are many uses for this, you can use this set up as your de-facto static database by storing the data in a private repo and running the public repo when you want to deploy!
Rest of the lines are optimization steps and in the last block of the GitHub Action Workflow, we deploy the web app to GitHub Pages from line 90.
Using the data and files from the private repo!